Translating All Kinds of Files
TXT Files
TXT files are pure text files. There are no extra tags and all the segments can be merged and splitted.
IDML Files
IDML is an XML based file format used by Adobe InDesign. Documents made by the latest version of InDesign have to be converted to IDML for use in old versions of InDesign. InDesign’s default file format is indd, which is a proprietary format. It cannot be opened by third-party applications. In order to translate InDesign documents, Indd files have to be converted to IDML files.
An IDML file is a compressed file in nature. Its structure is as follows.
.
├── META-INF
│   ├── container.xml
│   └── metadata.xml
├── MasterSpreads
│   └── MasterSpread_udd.xml
├── Resources
│   ├── Fonts.xml
│   ├── Graphic.xml
│   ├── Preferences.xml
│   └── Styles.xml
├── Spreads
│   ├── Spread_uc8.xml
│   ├── Spread_uce.xml
│   └── Spread_ucf.xml
├── Stories
│   ├── Story_u106.xml
│   ├── Story_u11d.xml
│   ├── Story_u134.xml
│   ├── Story_u151.xml
│   └── Story_ued.xml
├── XML
│   ├── BackingStory.xml
│   └── Tags.xml
├── designmap.xml
└── mimetype
What relevant to us are designmap.xml, spreads folder, stories folder and resources folder.
designmap.xml defines the document’s basic structure. A spread file includes the structure of one page or facing pages. A story file contains the text shown in a textframe. Fonts.xml stores font info and Styles.xml stores styles info.
BasicCAT reads designmap.xml and spreads files to get the order of stories shown in the document and extracts texts from story files.
Below is what a story file looks like:
<?xml version="1.0" encoding="UTF-8" standalone="yes"?>
<idPkg:Story xmlns:idPkg="http://ns.adobe.com/AdobeInDesign/idml/1.0/packaging" DOMVersion="13.0">
    <Story Self="u19caf" AppliedTOCStyle="n" UserText="true" IsEndnoteStory="false" TrackChanges="false" StoryTitle="$ID/" AppliedNamedGrid="n">
        <StoryPreference OpticalMarginAlignment="false" OpticalMarginSize="12" FrameType="TextFrameType" StoryOrientation="Horizontal" StoryDirection="LeftToRightDirection" />
        <InCopyExportOption IncludeGraphicProxies="true" IncludeAllResources="false" />
        <ParagraphStyleRange AppliedParagraphStyle="ParagraphStyle/Intro Copy">
            <CharacterStyleRange AppliedCharacterStyle="CharacterStyle/$ID/[No character style]">
                <Content>“No capes!” That’s what Edna says in the first film when Mr. Incredible wants a cape on his new Supersuit. She knows that capes can be dangerous for Supers. A cape caused one Super to get pulled into a jet turbine, and another was sucked into a spinning </Content>
            </CharacterStyleRange>
            <CharacterStyleRange AppliedCharacterStyle="CharacterStyle/Intro Copy Bold">
                <Content>vortex</Content>
            </CharacterStyleRange>
            <CharacterStyleRange AppliedCharacterStyle="CharacterStyle/$ID/[No character style]">
                <Content>. Capes could cause other problems, too. Let’s see what they are.</Content>
            </CharacterStyleRange>
            <CharacterStyleRange AppliedCharacterStyle="CharacterStyle/$ID/[No character style]" FillColor="Color/Black" FontStyle="300" PointSize="12">
                <Properties>
                    <Leading type="unit">20</Leading>
                </Properties>
                <Br />
            </CharacterStyleRange>
        </ParagraphStyleRange>
        <ParagraphStyleRange AppliedParagraphStyle="ParagraphStyle/Body Copy">
            <CharacterStyleRange AppliedCharacterStyle="CharacterStyle/$ID/[No character style]" />
        </ParagraphStyleRange>
    </Story>
</idPkg:Story>
Paragraph info is stored in the ParagraphStyleRange tag. One ParagraphStyleRange tag can include many CharacterStyleRange tags which include texts. There are two types of style in IDML. One is global style and the other is local style. Global styles are stored in Styles.xml. Story files use AppliedParagraphStyle and AppliedCharacterStyle attributes to mark global styles. Local styles are defined in the attributes and the properties element in story files, like PointSize and FontStyle.
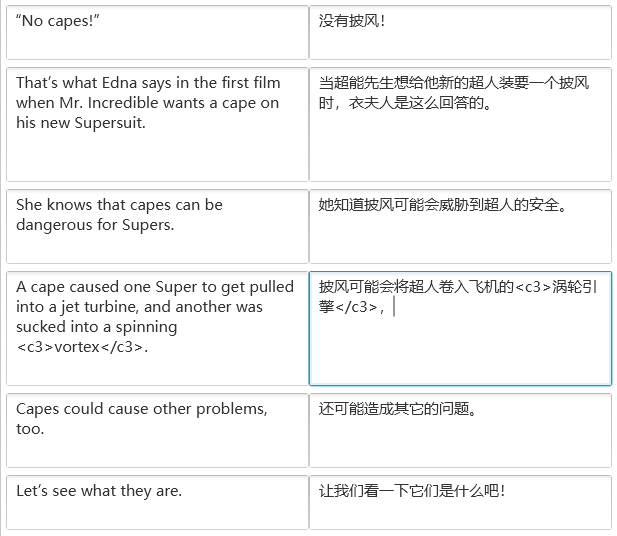
BasicCAT will convert the story file above into the tagged text below.
<p16><c0>“No capes!” That’s what Edna says in the first film when Mr. Incredible wants a cape on his new Supersuit. She knows that capes can be dangerous for Supers. A cape caused one Super to get pulled into a jet turbine, and another was sucked into a spinning </c0>
<c3>vortex</c3>
<c0>. Capes could cause other problems, too. Let’s see what they are.</c0>
<c0 id="3">
</c0>
</p16>
<p3><c0></c0>
</p3>
The numbers in p16 , c0 correspond to the rank of some global style in styles.xml. The id attribute of <c0 id="3"> corresponds to the rank of characterstylerange in a story file. The number is used to read local styles when generating target files. c0 is the default style that has no special formats. BasicCAT will hide it in the source text shown. Paragraph tags and tags without texts can also be hidden.
When the example story is opened by BasicCAT, the result looks like this:
c3 tag add bold font style to the text. English fonts often have many font weights, like Extra Light, Light, Normal and Heavy, while Chinese fonts often have only one regular font weight. The bold style of Chinese characters in Word is achieved by software algorithm, but IDML uses font weight to do this. So, to assure that the tags will make effects for English to Chinese translation projects, BasicCAT uses Source Han Serif as IDML’s Chinese font. Source Han Serif has 7 font weights. Font weight’s names of English fonts will be converted to names in Source Han Serif as follows.
- 100->ExtraLight
- 200->ExtraLight
- 300->Light
- 400->Regular
- 500->Medium
- 600->SemiBold
- 700->Bold
- 800->Heavy
- 900->Heavy
- Normal->Regular
- Black->Heavy
So, you need to install Source Han Serif to display Chinese in InDesign.
Translation of tags in IDML is not necessary. If there is no corresponding tags in target texts, c0 tags will be filled to make sure the translation will not be omitted.
XLIFF Files
XLIFF is an XML format for processing extracted text to be translated. CAT tools often use this format to store extracted text from files like docx, html and idml. When translation is done, CAT tools will generate target files based on XLIFF files.
XLIFF is a standard formulated by the OASIS organization and can be used as an intermediate format between different translation software.
XLIFF uses abstract placeholder tags inherited from opentag and encapsulating tags inherited from TMX to represent special formats.
For example, there are two ways to represent “This is bold.” in XLIFF.
Abstract placeholder:
<trans-unit id="1">
<source>This is <g id="1">bold</g>.</source>
</trans-unit>
Encapsulation:
<trans-unit id="1">
<source>This is <bpt id="1">\b</bpt>bold<ept id="1">\b0</ept>.</source>
</trans-unit>
The placeholder way abstracts tags to its preset placeholder tags. To indicate bold, HTML uses <b> and RTF uses \b. They all become <g> in XLIFF. It also shows less tags info. But after this abstraction, we cannot tell what function this tag has.
When translating XLIFF files, there will be tags in the source text. If tags are not put in the target text, BasicCAT will fill them at the end of target text. But this may result in incomplete content.
Attention
If tags are not put in the target text, BasicCAT will fill them at the end of target text. But this may result in incomplete content.
Below is the XLIFF extracted by okapi from the story file example in IDML part.
<?xml version="1.0" encoding="UTF-8"?>
<xliff version='1.2'
    xmlns='urn:oasis:names:tc:xliff:document:1.2'>
<file original="Stories/Story_u19caf.xml" source-language="en-US" target-language="zh-CN" datatype="xml">
<body>
<trans-unit id="NB085C0FA-tu1" xml:space="preserve">
    <source xml:lang="en-US"><g id="1">“No capes!” That’s what Edna says in the first film when Mr. Incredible wants a cape on his new Supersuit. She knows that capes can be dangerous for Supers. A cape caused one Super to get pulled into a jet turbine, and another was sucked into a spinning </g><g id="2">vortex</g><g id="3">. Capes could cause other problems, too. Let’s see what they are.</g></source>
    <target xml:lang="zh-CN"><g id="1">“No capes!” That’s what Edna says in the first film when Mr. Incredible wants a cape on his new Supersuit. She knows that capes can be dangerous for Supers. A cape caused one Super to get pulled into a jet turbine, and another was sucked into a spinning </g><g id="2">vortex</g><g id="3">. Capes could cause other problems, too. Let’s see what they are.</g></target>
</trans-unit>
</body>
</file>
</xliff>
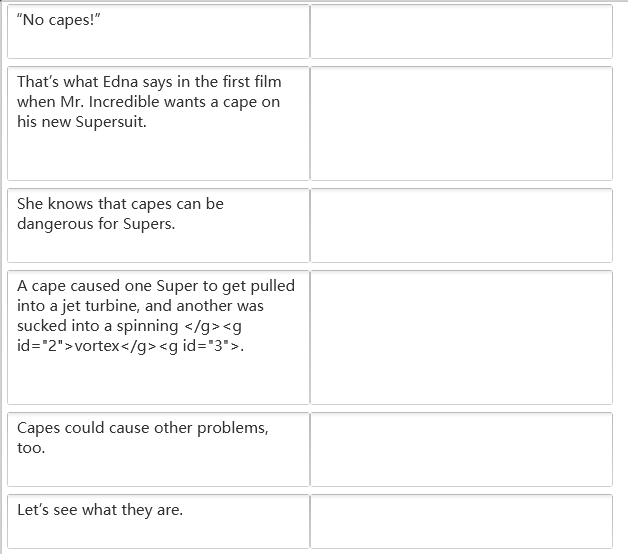
When the XLIFF file is opened by BasicCAT, the result looks like below. Single tag and paired tags at both sides of the segment will be hidden.
PO Files
PO is a format similar to XLIFF. It is designed to localize C programs at first.
Below is PO content extracted by okapi from the example IDML story file.
msgctxt "okpCtx:sd=197:tu=NB085C0FA-tu1"
msgid "<g1>“No capes!” That’s what Edna says in the first film when Mr. Incredible wants a cape on his new Supersuit. She knows that capes can be dangerous for Supers. A cape caused one Super to get pulled into a jet turbine, and another was sucked into a spinning </g1><g2>vortex</g2><g3>. Capes could cause other problems, too. Let’s see what they are.</g3>"
msgstr ""
msgctxt stores context info. msgid stores the source text and msgstr stores the target text. PO files created by okapi also uses tags to represent formats.
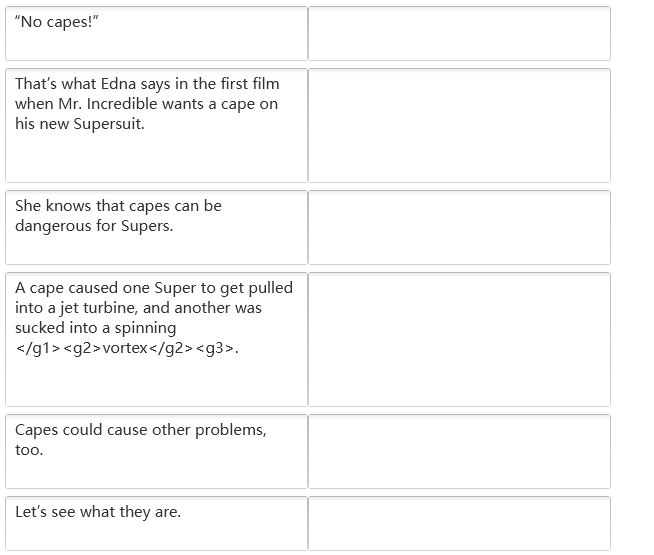
Below is how it looks when translating the PO file in BasicCAT. Like XLIFF, Single tag and paired tags at both sides of the segment will be hidden.
PDF Files
PDF file is a difficult format to process. It can be converted to docx by tools such as Word, ABBYY, Solid Document Converter, etc. But the original format cannot be well preserved. Adobe Acrobat can be used to modify text, but there are many limitations.
PDF files are often generated by files in another format, such as docx, idml, etc. It’s better to handle the source file directly. If you want to preserve the formats but do not have the source file, you have first translate text and do desktop publishing from anew.
When translating InDesign documents, publishing houses often give the PDF document to the translator. The translator types the translation into a Word and then gives it to the typesetter to replace sources texts with target texts in InDesign. In such a case, what translators have to do is to extract the text from PDF.
BasicCAT has a PDF to Text tool. It can be accessed by menu “Tools->PDF2TXT”. If PDF’s text can be extracted, it can be extracted directly by pressing the “strip” button. If not, the open source OCR software Tesseract will be used.
You can add page number to the extracted text. It can also add facing pages number like Page 4-5.
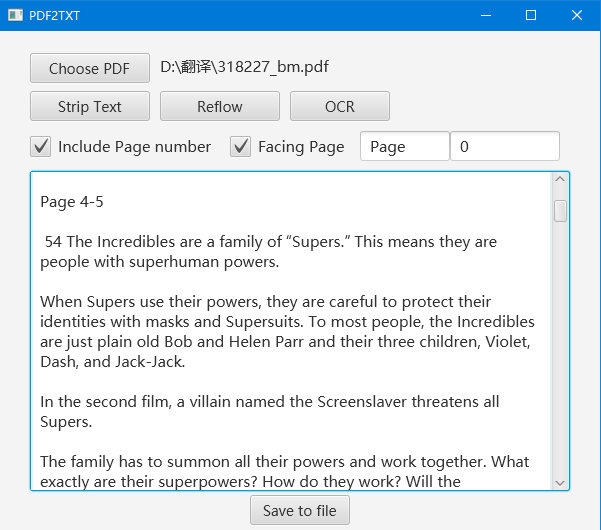
Texts in PDF do not have paragraph info. They are just fixed dots in a page. The extracted text may have newline at the end of each line. PDF2TXT provides “reflow” function to remove extra newlines.
About the installation of tesseract, Windows users can download a copy from here. PDF2TXT will ask for the path to tessearct.exe.
Linux and macOS(with homebrew) users can install tesseract-ocr directly. You may need to download extra language models.
Using Okapi to Translate Files in Other Formats
Okapi is a set of translation components. It has Checkmate to check translation quality, Ratel to edit segmentation rule and Rainbow to do all kinds of translation and localization tasks.
To translate files in other formats, we need to use Rainbow.
- Create XLIFF or PO files from source files
Open Rainbow and drag source files into the window.
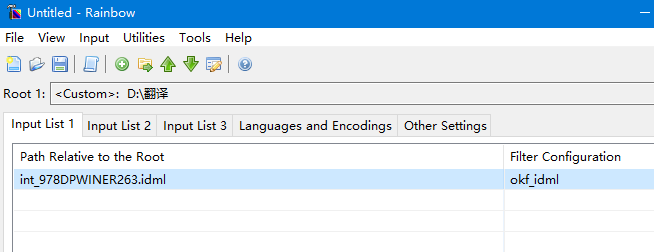
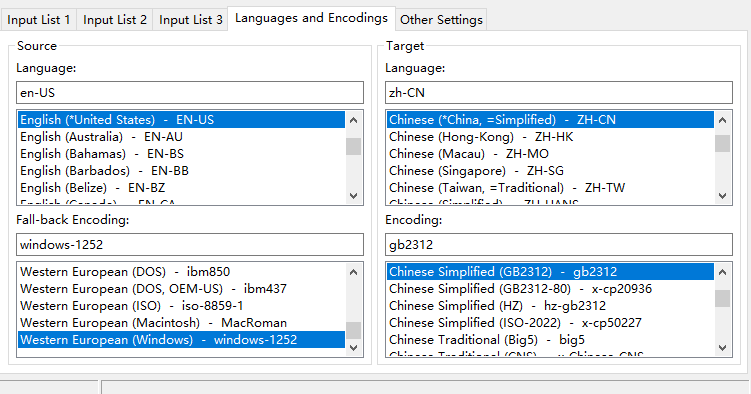
Set the source language, target languages, file encoding, etc.
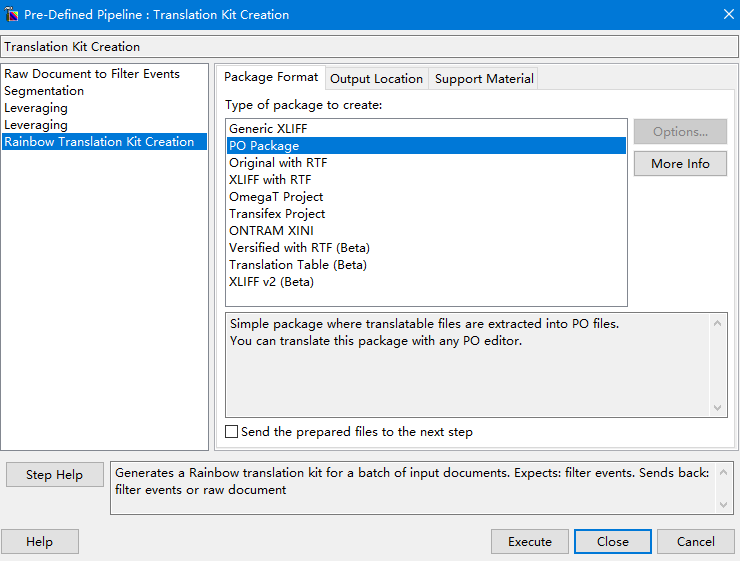
Click menu “Utilities->Translation Kit Creation”. You can choose to generate XLIFF, PO or other intermediate formats. The default output path is the source files’ folder.
After the execution is done, there will be a folder named pack1 in the output path. In the work folder are generated files.
- Generate target files from the previously created okapi project
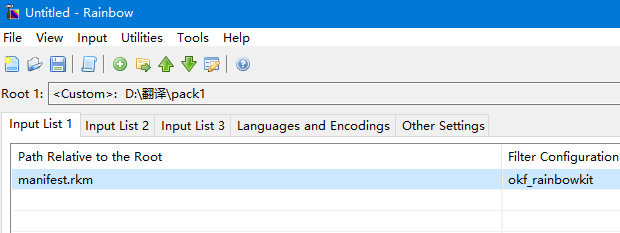
When the translation is done, put the translated files back into the work folder. Open Rainbow and drag manifest.rkm into it.
Click menu “Utilities->Translation Kit Post-processing” to generate target files.
Visit here to see what formats Okapi supports.
Starting from version 1.5, BasicCAT has integrated Okapi Tikal. It can automatically convert other format files into XLIFF files, and automatically generate target files from translated XLIFF files. However, if you need to modify the parameters that Okapi uses to process a format, you still need to use Rainbow.